Customer List
This menu helps you in creating the customer record. Click on the menu Customers then Customer List. The existing customer list is displayed.

Create Customer
Click on New, enter the customer details.
|
Menus |
Menu Name |
Description |
|
Details |
You can enter the necessary information for a given Customer. |
|
|
Reseller |
The Reseller's name is displayed, the Store and the customer associated with the reseller. |
|
|
Customer Name |
Enter the customer name, preferably the company name. |
|
|
Attribute Group |
You can select the product Attribute Group from the drop-down menu. |
|
|
Prorated Subscription |
Check this option to calculate the Subscription basis on a prorated basis. |
|
|
Credit Hold |
When you check this checkbox, the Store is on hold. Cannot place the Orders for Store/Customers who are on hold. |
|
|
Credit Hold Description |
When you have checked the Credit Hold option, you need to associate a credit hold description. |
|
|
Tax/VAT/GST ID |
Enter the Store Tax/VAT/GST ID, used for tax purposes. |
|
|
Software Version |
Displays the software version in use at the Customer end. |
|
|
Tax Exempt |
If the Store is exempted from the taxes, you can check this option. All invoices generated will be without tax. |
|
|
Allow Customer Login |
When you check this checkbox, the Customer gets access to the RMH Order Portal. |
|
|
Marketing Codes |
Click on the drop down menu to select the Marketing Code. |
|
|
Contact Information |
You can enter the contact details for a given customer. |
|
|
Contact Name |
Enter the contact person's name who will be accessing the portal. |
|
|
Telephone |
Enter the telephone number with the country and area code. |
|
|
Language |
Select the language option from the drop-down menu. |
|
|
Primary email |
Enter the primary Email address to receive emails from the portal. |
|
|
Billing email |
Enter the Billing Email address to receive billing/accounts related emails from the portal. |
|
|
Customer Number |
The Customer Number is an auto-generated, read-only field. |
|
|
Don't send Renewal Notice |
Check this option to stop sending renewal E-mails. |
|
|
Auto Renewal with card |
Check this option to process auto renewal orders with card on file. |
|
|
Auto Renewal without card |
Check this option to process auto renewal orders without card on file. |
|
|
Address Information |
This tab holds the geo-location information; all the fields are mandatory. |
|
|
Address |
Enter the physical address of your company. |
|
|
City |
Enter the City |
|
|
State/Region |
Enter the State or Region |
|
|
Zip Code |
Enter the ZIP code |
|
|
Country |
Select the Country from the drop-down menu. |
|
|
Payment Information |
You can set the price level created in the menu Selling Price Levels. |
|
|
Price level |
Select the price level option form the drop-down menu. |
|
|
Attribute Total |
Attribute total is the count of licenses purchased against each of the products. |
|
|
Item Attributes |
A read-only field. Updates on purchases of the product licenses by Store. |
|
|
Number of Stores - Update |
You can click on the button Update and view the latest number of Stores. |
|
|
Notes |
Add |
You can add notes and view the historical messages. Enter notes and click on Add. This section is enabled after you have created a customer record. |
On completion, click on Save to save the changes.
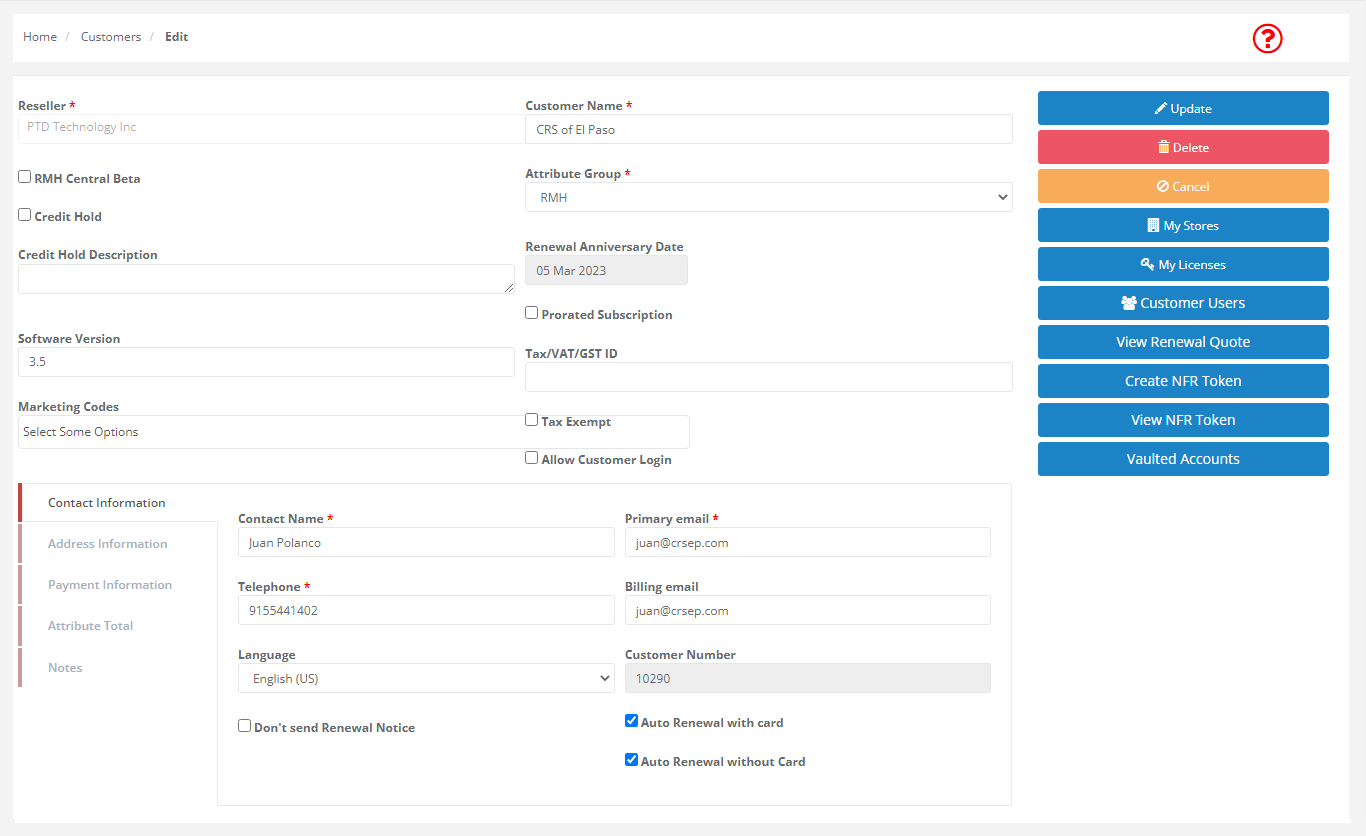
Edit Customer
You can edit the customer details as required. Click on the menu Customers then Customer List. The existing customer list is displayed.
Choose the desired from the list and double click record. You can edit the selected customer record.
You can view the additional details by clicking on the desired menu links.
Note: When the first order is successfully processed, the Renewal Anniversary date is set and viewed in the details section. This anniversary date is applicable for future purchases.